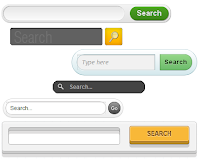
 Google
Custom Search is one of those tools whose list of Plus points is nearly
endless. From providing super relevant search results to options for
On-Demand Indexing. GCS is a boon for all Blog and Website Owners.But
the one thing that doesn't fit in place is its exceedingly over simple
Search Form ,that again with Google Watermark. In this post I will be
telling you how to change the Look of your GC Search Box with a CSS3
search Box.
Google
Custom Search is one of those tools whose list of Plus points is nearly
endless. From providing super relevant search results to options for
On-Demand Indexing. GCS is a boon for all Blog and Website Owners.But
the one thing that doesn't fit in place is its exceedingly over simple
Search Form ,that again with Google Watermark. In this post I will be
telling you how to change the Look of your GC Search Box with a CSS3
search Box.
Showing posts with label Blogger Widgets. Show all posts
Showing posts with label Blogger Widgets. Show all posts
Monday, October 29, 2012
Google
Custom Search is one of those tools whose list of Plus points is nearly
endless. From providing super relevant search results to options for
On-Demand Indexing. GCS is a boon for all Blog and Website Owners.But
the one thing that doesn't fit in place is its exceedingly over simple
Search Form ,that again with Google Watermark. In this post I will be
telling you how to change the Look of your GC Search Box with a CSS3
search Box.Monday, September 3, 2012
Pinterest is a social photo sharing website where user can create, share and manage online photos found on web. Pinterest Pin it buttons. It allows your visitors pin content without leaving your blog and further it is functional as the other popular social buttons such as Twitter tweet and Facebook like buttons.


There are three style you can choose from, a basic button (without the Pins counter), a vertical count button and a horizontal count button.
How to add Pinterest Pin It button to Blogger
1. Go to Blogger --> Template2. Backup your Template before making any changes to your blog
3. Click the Edit HTML button
3. Click the box "Expand Widget Templates"
4. Search for this code: <data:post.body/>
5. Paste the following code below (display button at the bottom of posts) or above ( display button below post titles).
Basic Button

Basic Button Code
<a class='pin-it-button' count-layout='horizontal' expr:href='"http://pinterest.com/pin/create/button/?url=" + data:post.url'>Pin It now!</a>
<a href='javascript:void(run_pinmarklet())' style='margin-left:-93px; width:43px; height:20px; display:inline-block;'/>
<script src='http://assets.pinterest.com/js/pinit.js' type='text/javascript'/>
<script type='text/javascript'>
function run_pinmarklet() {
var e=document.createElement('script');
e.setAttribute('type','text/javascript');
e.setAttribute('charset','UTF-8');
e.setAttribute('src','http://assets.pinterest.com/js/pinmarklet.js?r=' + Math.random()*99999999);
document.body.appendChild(e);
}
</script>
Vertical Count Button

Vertical Count Button Code
<a class='pin-it-button' count-layout='vertical' expr:href='"http://pinterest.com/pin/create/button/?url=" + data:post.url'>Pin It now!</a>
<a href='javascript:void(run_pinmarklet())' style='margin-left:-46px; width:43px; height:20px; display:inline-block;'/>
<script src='http://assets.pinterest.com/js/pinit.js' type='text/javascript'/>
<script type='text/javascript'>
function run_pinmarklet() {
var e=document.createElement('script'); e.setAttribute('type','text/javascript');
e.setAttribute('charset','UTF-8');
e.setAttribute('src','http://assets.pinterest.com/js/pinmarklet.js?r=' + Math.random()*99999999);
document.body.appendChild(e);
}
</script>
Horizontal Count Button

Horizontal Button Code
6.Save your template and you are all done!<a class='pin-it-button' count-layout='horizontal' expr:href='"http://pinterest.com/pin/create/button/?url=" + data:post.url'>Pin It Now!</a>
<a href='javascript:void(run_pinmarklet())' style='margin-left:-93px; width:43px; height:20px; display:inline-block;'/>
<script src='http://assets.pinterest.com/js/pinit.js' type='text/javascript'/>
<script type='text/javascript'>
function run_pinmarklet() {
var e=document.createElement('script'); e.setAttribute('type','text/javascript');
e.setAttribute('charset','UTF-8');
e.setAttribute('src','http://assets.pinterest.com/js/pinmarklet.js?r=' + Math.random()*99999999);
document.body.appendChild(e);
}
</script>
Sunday, August 26, 2012
 You might have seen recent post widget hanging on the sidebar of
several blogs but most often this widgets have a JavaScript Code in it
that badly increases the load time of your page. Today we will learn how
to add a Recent posts widget offered by Feedburner to your blogs which
is tidy, attractive, unique and most importantly fast loading.
You might have seen recent post widget hanging on the sidebar of
several blogs but most often this widgets have a JavaScript Code in it
that badly increases the load time of your page. Today we will learn how
to add a Recent posts widget offered by Feedburner to your blogs which
is tidy, attractive, unique and most importantly fast loading.
Let
me tell you that Feedburner also uses JavaScript but it’s really smart
when it comes to page Load time, because the JavaScript is not directly
linked to your blog, 50% of the load time is shared by FeedBurner.
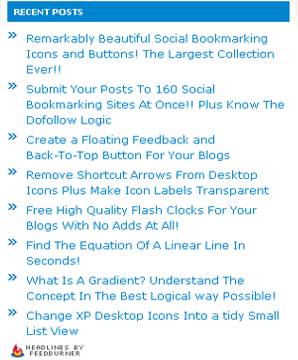
Feedburner Recent Posts Widget
Feedburner
as you all know is the best web service for submitting your blog feed.
Once you sign up with them they will provide you with several widgets
like a Rotating Headlines Banner, Subscription Email form as you can see
on my sidebar, a feed counter and most importantly a Recent Post widget
like the one on my sidebar,
These are steps you may follow,
1. Sign up for a Feedburner Account , which I hope you already have.
2. Log in your account and click on the Publicize button as shown below,

3. Then Click on BuzzBoost on the sidebar at your left.

4. On the page that opens , you will see a small form,
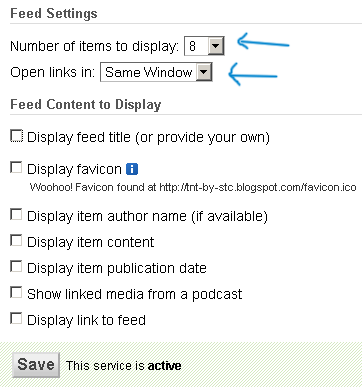
Fill the form with relevant information. Leave all Boxes unchecked. Keep the number of items (Links) as low as possible. You can choose 8 links to be displayed but 6 would be better. Choose Links to be opened in Same Window
5. Now copy the code they provide you as shown below,

6. Log in your blogger Account and then go to Layout > Page Elements

7. Select add a gadget and the choose HTML/JavaScript


8. Now Paste the code into the widget and give it a title “ Recent Posts”
9. Done!
Saturday, August 18, 2012
This is cool widget to blogger.It include
five useful function menubar. It will appear
on left side of blogger.You can try to add it
to your blogger. How To Add Blogger
Vertical Stylish Css3 Side Menubar.
try below steps.
1. Go to Older Posts
2. Go to Newer Posts
3. Reload Page
4. Home
5. Back to top

1. Log in to blogger account and Go to Design >> Edit HTML
(make sure backup your template first)
2. Put checked marked in Expand Widget Templates
3. Find this tag by using Ctrl+F ]]></b:skin>
4. Paste below code Before ]]></b:skin> tag
5. Now Find this code by using Ctrl+F <b:includable id='main' var='top'>
6. Paste below code Before <b:includable id='main' var='top'> code
7. Now save your template
you are done.
five useful function menubar. It will appear
on left side of blogger.You can try to add it
to your blogger. How To Add Blogger
Vertical Stylish Css3 Side Menubar.
try below steps.
1. Go to Older Posts
2. Go to Newer Posts
3. Reload Page
4. Home
5. Back to top
(make sure backup your template first)
2. Put checked marked in Expand Widget Templates
3. Find this tag by using Ctrl+F ]]></b:skin>
4. Paste below code Before ]]></b:skin> tag
#float-menu{position:fixed;top:20%;left:0;border-top:1px solid
#CCC;border-right:1px solid #CCC;border-bottom:1px solid
#CCC;background:#EEE}
#float-menu ul{padding:0}
#float-menu li{margin:5px;list-style-type:none}
#float-menu li,#float-menu li a{width:24px;height:24px}
#float-menu li a{float:left}
#float-menu #menu-right,#float-menu #menu-left,#float-menu li
a{background:url(https://blogger.googleusercontent.com/img/b/R29vZ2xl/AVvXsEhtkvEtnQdM-sqQkQbEq5WofGpHPU72Ed9hWTjN468khqO2ieeKOtji01iW-jhx_dM61SC6KCLyGMOawktbtgHR2NbSbeQY2tU2S68nGhr4FMQuMTzfbUx40cX1nKm1A1LDNOP1o4glc563/s1600/float+menu.png)}
#float-menu #menu-right a{background-position:0 -120px}

#float-menu #menu-right a:hover,#float-menu #menu-right{background-position:-24px -120px}

#float-menu #menu-left a{background-position:0 -24px}

#float-menu #menu-left a:hover,#float-menu #menu-left{background-position:-24px -24px}

#float-menu #menu-random a{background-position:0 -48px}

#float-menu #menu-random a:hover{background-position:-24px -48px}

#float-menu #menu-home a{background-position:0 -72px}

#float-menu #menu-home a:hover{background-position:-24px -72px}

#float-menu #menu-top a{background-position:0 -96px}

#float-menu #menu-top a:hover{background-position:-24px -96px}
5. Now Find this code by using Ctrl+F <b:includable id='main' var='top'>
6. Paste below code Before <b:includable id='main' var='top'> code
<div id='float-menu'>
<ul>
<li id='menu-right'>
<b:if cond='data:olderPageUrl'>
<b:if cond='data:olderPageUrl != data:blog.url'>
<a expr:href='data:olderPageUrl' rel='prev' expr:title='data:olderPageTitle'></a>
</b:if>
</b:if>

</li>

<li id='menu-left'>

<b:if cond='data:newerPageUrl'>

<b:if cond='data:newerPageUrl != data:blog.url'>

<a expr:href='data:newerPageUrl' rel='next' expr:title='data:newerPageTitle'></a>

</b:if>

</b:if>

</li>

<li id='menu-random'>

<script type='text/javaScript'>//<![CDATA[

var rdp_current=0;total_posts=0;function
totalposts(json){total_posts=json.feed.openSearch$totalResults.$t}document.write('<script
 type=\"text/javascript\"
src=\"/feeds/posts/default?alt=json-in-script&max-results=0&callback=totalposts\"><\/script>');function
 getvalue(){rdp_current=1+Math.round(Math.random()*(total_posts-1))};

//]]></script>

<script type='text/javaScript'>//<![CDATA[

function rdp(json){var dw='';entry=json.feed.entry[0];for(var
i=0;i<entry.link.length;i++){if(entry.link[i].rel=='alternate'){rdp_posturl=entry.link[i].href}};dw+='<a
 href="'+rdp_posturl+'"  title="Reload"
rel="nofollow"></a>';document.getElementById('menu-random').innerHTML=dw;};getvalue();document.write('<script
 type=\"text/javascript\"
src=\"/feeds/posts/default?alt=json-in-script&start-index='+rdp_current+'&max-results=1&callback=rdp\"><\/script>');

//]]></script>

</li>

<li id='menu-home'>

<a expr:href='data:blog.homepageUrl' title='Home'/>

</li>

<li id='menu-top'>

<a href='#' title='Back to top' rel="nofollow"/>

</li>

</ul>

</div>
7. Now save your template
you are done.
How to make a blog page number navigation easily
Actually sometime hard to find working number navigation
gadget for blogger.So this post will help you to add page
number navigation easily. it will helpful to your visitors to
keep watching your other post.so you can increase page-views.
Its just blogger widget . try it.
1. Log in to blogger account > Go to Design >> Page Element
2. Click Add Gadget and select 'HTML/Javascript'
3. Paste below code.

You can change 1 and 3 and color code as your like.get your color code here
4. Save HTML/Javascript. you are done.
Actually sometime hard to find working number navigation
gadget for blogger.So this post will help you to add page
number navigation easily. it will helpful to your visitors to
keep watching your other post.so you can increase page-views.
Its just blogger widget . try it.
1. Log in to blogger account > Go to Design >> Page Element
2. Click Add Gadget and select 'HTML/Javascript'
3. Paste below code.

You can change 1 and 3 and color code as your like.get your color code here
4. Save HTML/Javascript. you are done.
Monday, August 13, 2012

Steps To Add Bubble Buttons To Blogger
- Login to your Dashboard.
- Go to Template >>Edit Html.
- Find for ]]></b:skin> tag.
- Paste the below code just above ]]></b:skin> tag

.button {
font: 15px Calibri, Arial, sans-serif;
text-shadow: 1px 1px 0 rgba(255,255,255,0.4);
text-decoration: none !important;
white-space: nowrap;
display: inline-block;
vertical-align: baseline;
position: relative;
cursor: pointer;
padding: 10px 20px;
background-repeat: no-repeat;
background-position: bottom left;
background-image: url('http://i1269.photobucket.com/albums/jj591/aditya9172/blog-toolzbutton.png');
background-position: bottom left, top right, 0 0, 0 0;
background-clip: border-box;
-moz-border-radius: 9px;
-webkit-border-radius: 9px;
border-radius: 9px;
-moz-box-shadow: 0 0 1px #fff inset;
-webkit-box-shadow: 0 0 1px #fff inset;
box-shadow: 0 0 1px #fff inset;
-webkit-transition: background-position 1.2s;
-moz-transition: background-position 1.2s;
transition: background-position 1.2s;
}
.button:hover {
background-position: top left;
background-position: top left, bottom right, 0 0, 0 0;
}
.button:active {
bottom: -3px;
}
.button.big {
font-size: 30px;
}
.button.medium {
font-size: 16px;
}
.button.small {
font-size: 12px;
}
.button.rounded {
-moz-border-radius: 4em;
-webkit-border-radius: 4em;
border-radius: 4em;
}
.blue.button {
color: #0f4b6d !important;
border: 1px solid #84acc3 !important;
background-color: #48b5f2;
background-image: url('http://i1269.photobucket.com/albums/jj591/aditya9172/blog-toolzbutton.png'), url('http://i1269.photobucket.com/albums/jj591/aditya9172/blog-toolzbutton.png'),
-moz-radial-gradient( center bottom, circle,
rgba(89,208,244,1) 0,rgba(89,208,244,0) 100px),
-moz-linear-gradient(#4fbbf7, #3faeeb);
background-image: url('http://i1269.photobucket.com/albums/jj591/aditya9172/blog-toolzbutton.png'), url('http://i1269.photobucket.com/albums/jj591/aditya9172/blog-toolzbutton.png'),
-webkit-gradient( radial, 50% 100%, 0, 50% 100%, 100,
from(rgba(89,208,244,1)), to(rgba(89,208,244,0))),
-webkit-gradient(linear, 0% 0%, 0% 100%, from(#4fbbf7), to(#3faeeb));
}
.blue.button:hover {
background-color: #63c7fe;
background-image: url('http://i1269.photobucket.com/albums/jj591/aditya9172/blog-toolzbutton.png'), url('http://i1269.photobucket.com/albums/jj591/aditya9172/blog-toolzbutton.png'),
-moz-radial-gradient( center bottom, circle,
rgba(109,217,250,1) 0,rgba(109,217,250,0) 100px),
-moz-linear-gradient(#63c7fe, #58bef7);
background-image: url('http://i1269.photobucket.com/albums/jj591/aditya9172/blog-toolzbutton.png'), url('http://i1269.photobucket.com/albums/jj591/aditya9172/blog-toolzbutton.png'),
-webkit-gradient( radial, 50% 100%, 0, 50% 100%, 100,
from(rgba(109,217,250,1)), to(rgba(109,217,250,0))),
-webkit-gradient(linear, 0% 0%, 0% 100%, from(#63c7fe), to(#58bef7));
}
.green.button {
color: #345903 !important;
border: 1px solid #96a37b !important;
background-color: #79be1e;
background-image: url('http://i1269.photobucket.com/albums/jj591/aditya9172/blog-toolzbutton.png'), url('http://i1269.photobucket.com/albums/jj591/aditya9172/blog-toolzbutton.png'), -moz-radial-gradient(center bottom, circle, rgba(162,211,30,1) 0,rgba(162,211,30,0) 100px),-moz-linear-gradient(#82cc27, #74b317);
background-image: url('http://i1269.photobucket.com/albums/jj591/aditya9172/blog-toolzbutton.png'), url('http://i1269.photobucket.com/albums/jj591/aditya9172/blog-toolzbutton.png'), -webkit-gradient(radial, 50% 100%, 0, 50% 100%, 100, from(rgba(162,211,30,1)), to(rgba(162,211,30,0))),-webkit-gradient(linear, 0% 0%, 0% 100%, from(#82cc27), to(#74b317));
}
.green.button:hover {
background-color: #89d228;
background-image: url('http://i1269.photobucket.com/albums/jj591/aditya9172/blog-toolzbutton.png'), url('http://i1269.photobucket.com/albums/jj591/aditya9172/blog-toolzbutton.png'), -moz-radial-gradient(center bottom, circle, rgba(183,229,45,1) 0,rgba(183,229,45,0) 100px),-moz-linear-gradient(#90de31, #7fc01e);
background-image: url('http://i1269.photobucket.com/albums/jj591/aditya9172/blog-toolzbutton.png'), url('http://i1269.photobucket.com/albums/jj591/aditya9172/blog-toolzbutton.png'), -webkit-gradient(radial, 50% 100%, 0, 50% 100%, 100, from(rgba(183,229,45,1)), to(rgba(183,229,45,0))),-webkit-gradient(linear, 0% 0%, 0% 100%, from(#90de31), to(#7fc01e));
}
.orange.button {
color: #693e0a !important;
border: 1px solid #bea280 !important;
background-color: #e38d27;
background-image: url('http://i1269.photobucket.com/albums/jj591/aditya9172/blog-toolzbutton.png'), url('http://i1269.photobucket.com/albums/jj591/aditya9172/blog-toolzbutton.png'), -moz-radial-gradient(center bottom, circle, rgba(232,189,45,1) 0,rgba(232,189,45,0) 100px),-moz-linear-gradient(#f1982f, #d4821f);
background-image: url('http://i1269.photobucket.com/albums/jj591/aditya9172/blog-toolzbutton.png'), url('http://i1269.photobucket.com/albums/jj591/aditya9172/blog-toolzbutton.png'), -webkit-gradient(radial, 50% 100%, 0, 50% 100%, 100, from(rgba(232,189,45,1)), to(rgba(232,189,45,0))),-webkit-gradient(linear, 0% 0%, 0% 100%, from(#f1982f), to(#d4821f));
}
.orange.button:hover {
background-color: #ec9732;
background-image: url('http://i1269.photobucket.com/albums/jj591/aditya9172/blog-toolzbutton.png'), url('http://i1269.photobucket.com/albums/jj591/aditya9172/blog-toolzbutton.png'), -moz-radial-gradient(center bottom, circle, rgba(241,192,52,1) 0,rgba(241,192,52,0) 100px),-moz-linear-gradient(#f9a746, #e18f2b);
background-image: url('http://i1269.photobucket.com/albums/jj591/aditya9172/blog-toolzbutton.png'), url('http://i1269.photobucket.com/albums/jj591/aditya9172/blog-toolzbutton.png'), -webkit-gradient(radial, 50% 100%, 0, 50% 100%, 100, from(rgba(241,192,52,1)), to(rgba(241,192,52,0))),-webkit-gradient(linear, 0% 0%, 0% 100%, from(#f9a746), to(#e18f2b));
}
.gray.button {
color: #525252 !important;
border: 1px solid #a5a5a5 !important;
background-color: #a9adb1;
background-image: url('http://i1269.photobucket.com/albums/jj591/aditya9172/blog-toolzbutton.png'), url('http://i1269.photobucket.com/albums/jj591/aditya9172/blog-toolzbutton.png'), -moz-radial-gradient(center bottom, circle, rgba(197,199,202,1) 0,rgba(197,199,202,0) 100px),-moz-linear-gradient(#c5c7ca, #92989c);
background-image: url('http://i1269.photobucket.com/albums/jj591/aditya9172/blog-toolzbutton.png'), url('http://i1269.photobucket.com/albums/jj591/aditya9172/blog-toolzbutton.png'), -webkit-gradient(radial, 50% 100%, 0, 50% 100%, 100, from(rgba(197,199,202,1)), to(rgba(197,199,202,0))),-webkit-gradient(linear, 0% 0%, 0% 100%, from(#c5c7ca), to(#92989c));
}
.gray.button:hover {
background-color: #b6bbc0;
background-image: url('http://i1269.photobucket.com/albums/jj591/aditya9172/blog-toolzbutton.png'), url('http://i1269.photobucket.com/albums/jj591/aditya9172/blog-toolzbutton.png'), -moz-radial-gradient(center bottom, circle, rgba(202,205,208,1) 0,rgba(202,205,208,0) 100px),-moz-linear-gradient(#d1d3d6, #9fa5a9);
background-image: url('http://i1269.photobucket.com/albums/jj591/aditya9172/blog-toolzbutton.png'), url('http://i1269.photobucket.com/albums/jj591/aditya9172/blog-toolzbutton.png'), -webkit-gradient(radial, 50% 100%, 0, 50% 100%, 100, from(rgba(202,205,208,1)), to(rgba(202,205,208,0))),-webkit-gradient(linear, 0% 0%, 0% 100%, from(#d1d3d6), to(#9fa5a9));
}
font: 15px Calibri, Arial, sans-serif;
text-shadow: 1px 1px 0 rgba(255,255,255,0.4);
text-decoration: none !important;
white-space: nowrap;
display: inline-block;
vertical-align: baseline;
position: relative;
cursor: pointer;
padding: 10px 20px;
background-repeat: no-repeat;
background-position: bottom left;
background-image: url('http://i1269.photobucket.com/albums/jj591/aditya9172/blog-toolzbutton.png');
background-position: bottom left, top right, 0 0, 0 0;
background-clip: border-box;
-moz-border-radius: 9px;
-webkit-border-radius: 9px;
border-radius: 9px;
-moz-box-shadow: 0 0 1px #fff inset;
-webkit-box-shadow: 0 0 1px #fff inset;
box-shadow: 0 0 1px #fff inset;
-webkit-transition: background-position 1.2s;
-moz-transition: background-position 1.2s;
transition: background-position 1.2s;
}
.button:hover {
background-position: top left;
background-position: top left, bottom right, 0 0, 0 0;
}
.button:active {
bottom: -3px;
}
.button.big {
font-size: 30px;
}
.button.medium {
font-size: 16px;
}
.button.small {
font-size: 12px;
}
.button.rounded {
-moz-border-radius: 4em;
-webkit-border-radius: 4em;
border-radius: 4em;
}
.blue.button {
color: #0f4b6d !important;
border: 1px solid #84acc3 !important;
background-color: #48b5f2;
background-image: url('http://i1269.photobucket.com/albums/jj591/aditya9172/blog-toolzbutton.png'), url('http://i1269.photobucket.com/albums/jj591/aditya9172/blog-toolzbutton.png'),
-moz-radial-gradient( center bottom, circle,
rgba(89,208,244,1) 0,rgba(89,208,244,0) 100px),
-moz-linear-gradient(#4fbbf7, #3faeeb);
background-image: url('http://i1269.photobucket.com/albums/jj591/aditya9172/blog-toolzbutton.png'), url('http://i1269.photobucket.com/albums/jj591/aditya9172/blog-toolzbutton.png'),
-webkit-gradient( radial, 50% 100%, 0, 50% 100%, 100,
from(rgba(89,208,244,1)), to(rgba(89,208,244,0))),
-webkit-gradient(linear, 0% 0%, 0% 100%, from(#4fbbf7), to(#3faeeb));
}
.blue.button:hover {
background-color: #63c7fe;
background-image: url('http://i1269.photobucket.com/albums/jj591/aditya9172/blog-toolzbutton.png'), url('http://i1269.photobucket.com/albums/jj591/aditya9172/blog-toolzbutton.png'),
-moz-radial-gradient( center bottom, circle,
rgba(109,217,250,1) 0,rgba(109,217,250,0) 100px),
-moz-linear-gradient(#63c7fe, #58bef7);
background-image: url('http://i1269.photobucket.com/albums/jj591/aditya9172/blog-toolzbutton.png'), url('http://i1269.photobucket.com/albums/jj591/aditya9172/blog-toolzbutton.png'),
-webkit-gradient( radial, 50% 100%, 0, 50% 100%, 100,
from(rgba(109,217,250,1)), to(rgba(109,217,250,0))),
-webkit-gradient(linear, 0% 0%, 0% 100%, from(#63c7fe), to(#58bef7));
}
.green.button {
color: #345903 !important;
border: 1px solid #96a37b !important;
background-color: #79be1e;
background-image: url('http://i1269.photobucket.com/albums/jj591/aditya9172/blog-toolzbutton.png'), url('http://i1269.photobucket.com/albums/jj591/aditya9172/blog-toolzbutton.png'), -moz-radial-gradient(center bottom, circle, rgba(162,211,30,1) 0,rgba(162,211,30,0) 100px),-moz-linear-gradient(#82cc27, #74b317);
background-image: url('http://i1269.photobucket.com/albums/jj591/aditya9172/blog-toolzbutton.png'), url('http://i1269.photobucket.com/albums/jj591/aditya9172/blog-toolzbutton.png'), -webkit-gradient(radial, 50% 100%, 0, 50% 100%, 100, from(rgba(162,211,30,1)), to(rgba(162,211,30,0))),-webkit-gradient(linear, 0% 0%, 0% 100%, from(#82cc27), to(#74b317));
}
.green.button:hover {
background-color: #89d228;
background-image: url('http://i1269.photobucket.com/albums/jj591/aditya9172/blog-toolzbutton.png'), url('http://i1269.photobucket.com/albums/jj591/aditya9172/blog-toolzbutton.png'), -moz-radial-gradient(center bottom, circle, rgba(183,229,45,1) 0,rgba(183,229,45,0) 100px),-moz-linear-gradient(#90de31, #7fc01e);
background-image: url('http://i1269.photobucket.com/albums/jj591/aditya9172/blog-toolzbutton.png'), url('http://i1269.photobucket.com/albums/jj591/aditya9172/blog-toolzbutton.png'), -webkit-gradient(radial, 50% 100%, 0, 50% 100%, 100, from(rgba(183,229,45,1)), to(rgba(183,229,45,0))),-webkit-gradient(linear, 0% 0%, 0% 100%, from(#90de31), to(#7fc01e));
}
.orange.button {
color: #693e0a !important;
border: 1px solid #bea280 !important;
background-color: #e38d27;
background-image: url('http://i1269.photobucket.com/albums/jj591/aditya9172/blog-toolzbutton.png'), url('http://i1269.photobucket.com/albums/jj591/aditya9172/blog-toolzbutton.png'), -moz-radial-gradient(center bottom, circle, rgba(232,189,45,1) 0,rgba(232,189,45,0) 100px),-moz-linear-gradient(#f1982f, #d4821f);
background-image: url('http://i1269.photobucket.com/albums/jj591/aditya9172/blog-toolzbutton.png'), url('http://i1269.photobucket.com/albums/jj591/aditya9172/blog-toolzbutton.png'), -webkit-gradient(radial, 50% 100%, 0, 50% 100%, 100, from(rgba(232,189,45,1)), to(rgba(232,189,45,0))),-webkit-gradient(linear, 0% 0%, 0% 100%, from(#f1982f), to(#d4821f));
}
.orange.button:hover {
background-color: #ec9732;
background-image: url('http://i1269.photobucket.com/albums/jj591/aditya9172/blog-toolzbutton.png'), url('http://i1269.photobucket.com/albums/jj591/aditya9172/blog-toolzbutton.png'), -moz-radial-gradient(center bottom, circle, rgba(241,192,52,1) 0,rgba(241,192,52,0) 100px),-moz-linear-gradient(#f9a746, #e18f2b);
background-image: url('http://i1269.photobucket.com/albums/jj591/aditya9172/blog-toolzbutton.png'), url('http://i1269.photobucket.com/albums/jj591/aditya9172/blog-toolzbutton.png'), -webkit-gradient(radial, 50% 100%, 0, 50% 100%, 100, from(rgba(241,192,52,1)), to(rgba(241,192,52,0))),-webkit-gradient(linear, 0% 0%, 0% 100%, from(#f9a746), to(#e18f2b));
}
.gray.button {
color: #525252 !important;
border: 1px solid #a5a5a5 !important;
background-color: #a9adb1;
background-image: url('http://i1269.photobucket.com/albums/jj591/aditya9172/blog-toolzbutton.png'), url('http://i1269.photobucket.com/albums/jj591/aditya9172/blog-toolzbutton.png'), -moz-radial-gradient(center bottom, circle, rgba(197,199,202,1) 0,rgba(197,199,202,0) 100px),-moz-linear-gradient(#c5c7ca, #92989c);
background-image: url('http://i1269.photobucket.com/albums/jj591/aditya9172/blog-toolzbutton.png'), url('http://i1269.photobucket.com/albums/jj591/aditya9172/blog-toolzbutton.png'), -webkit-gradient(radial, 50% 100%, 0, 50% 100%, 100, from(rgba(197,199,202,1)), to(rgba(197,199,202,0))),-webkit-gradient(linear, 0% 0%, 0% 100%, from(#c5c7ca), to(#92989c));
}
.gray.button:hover {
background-color: #b6bbc0;
background-image: url('http://i1269.photobucket.com/albums/jj591/aditya9172/blog-toolzbutton.png'), url('http://i1269.photobucket.com/albums/jj591/aditya9172/blog-toolzbutton.png'), -moz-radial-gradient(center bottom, circle, rgba(202,205,208,1) 0,rgba(202,205,208,0) 100px),-moz-linear-gradient(#d1d3d6, #9fa5a9);
background-image: url('http://i1269.photobucket.com/albums/jj591/aditya9172/blog-toolzbutton.png'), url('http://i1269.photobucket.com/albums/jj591/aditya9172/blog-toolzbutton.png'), -webkit-gradient(radial, 50% 100%, 0, 50% 100%, 100, from(rgba(202,205,208,1)), to(rgba(202,205,208,0))),-webkit-gradient(linear, 0% 0%, 0% 100%, from(#d1d3d6), to(#9fa5a9));
}
- Now,click on Save the Template.
- Now, write a New Post.
- To have this button there just paste any of the below code as per your choice.
For Big Buttons
<a href="LINK HERE" class="button big blue">TEXT HERE</a>
<a href="LINK HERE" class="button big green">TEXT HERE</a>
<a href="LINK HERE" class="button big orange">TEXT HERE</a>
<a href="LINK HERE" class="button big gray">TEXT HERE</a>
<a href="LINK HERE" class="button big green">TEXT HERE</a>
<a href="LINK HERE" class="button big orange">TEXT HERE</a>
<a href="LINK HERE" class="button big gray">TEXT HERE</a>
For Medium Buttons
<a href="LINK HERE" class="button blue medium">TEXT HERE</a>
<a href="LINK HERE" class="button green medium">TEXT HERE</a>
<a href="LINK HERE" class="button orange medium">TEXT HERE</a>
<a href="LINK HERE" class="button gray medium">TEXT HERE</a>
<a href="LINK HERE" class="button green medium">TEXT HERE</a>
<a href="LINK HERE" class="button orange medium">TEXT HERE</a>
<a href="LINK HERE" class="button gray medium">TEXT HERE</a>
For Small Buttons
<a href="LINK HERE" class="button small blue">TEXT HERE</a>
<a href="LINK HERE" class="button small green">TEXT HERE</a>
<a href="LINK HERE" class="button small orange">TEXT HERE</a>
<a href="LINK HERE" class="button small gray">TEXT HERE</a>
<a href="LINK HERE" class="button small green">TEXT HERE</a>
<a href="LINK HERE" class="button small orange">TEXT HERE</a>
<a href="LINK HERE" class="button small gray">TEXT HERE</a>
For Small Rounded Buttons
<a href="LINK HERE" class="button small blue rounded">TEXT HERE</a>
<a href="LINK HERE" class="button small green rounded">TEXT HERE</a>
<a href="LINK HERE" class="button small orange rounded">TEXT HERE</a>
<a href="LINK HERE" class="button small gray rounded">TEXT HERE</a>
<a href="LINK HERE" class="button small green rounded">TEXT HERE</a>
<a href="LINK HERE" class="button small orange rounded">TEXT HERE</a>
<a href="LINK HERE" class="button small gray rounded">TEXT HERE</a>
It's Done.
Subscribe to:
Posts (Atom)


